
Before a shovel hits the ground, your site grading plan tells the whole story — how water drains, where the ground rises or falls, and whether your pavement will stand the test of time. But for most developers, general contractors, and landowners, reading one feels like deciphering another language.
The good news: once you know what to look for, grading plans become simple roadmaps to a solid, buildable site.
Need help interpreting your plans? Schedule a free site visit and quote.
What a Grading Plan Actually Shows
A site grading plan is more than a sheet of lines — it’s a visual guide to how the land will be shaped, drained, and stabilized. Here’s what you’ll typically see and what each element means.
Contour lines: Curved lines that connect points of equal elevation. The closer they are, the steeper the slope. The wider they spread, the flatter the surface.
Spot elevations: Single points marked with a “+” and a number (for example, +100.5). These are exact elevation values at key spots like corners, drains, or driveways.
Finished Floor Elevation (FFE): The final top elevation of your building pad. Everything else — driveway, grading, and drainage — should slope away from this point.
Drainage arrows: Indicate the direction surface water will flow across the site.
Swales and ditches: Shallow, graded channels that move stormwater safely away from structures.
Cut and fill areas: Where soil will be excavated (cut) or added (fill) to achieve the design elevation.
Erosion control notes: Callouts for silt fence, riprap, or sediment basins that protect downstream waterways.
Retaining walls or slopes: Show where elevation changes sharply and structural support is required.
Your grading plan is the roadmap for every phase of site work and excavation—it guides crews in shaping the ground so each elevation in the field matches what’s shown on paper.
How to Read a Grading Plan Step-by-Step
Follow these simple steps to understand any grading plan — no engineering degree required:
Step 1: Find the north arrow, scale, and legend.
These orientation tools tell you how big the site is and where everything sits in relation to each other.
Step 2: Locate the benchmark or datum.
This is the “zero point” or fixed elevation from which all others are measured. It might reference a manhole rim, curb, or known survey point.
Step 3: Identify existing vs. proposed contours.
Existing grades are usually dashed lines; proposed grades are solid. Comparing them shows where the site will be cut or filled.
Step 4: Review the Finished Floor Elevation (FFE).
This marks the elevation at the top of your concrete slab or foundation. Slopes should always drain away from it — usually at least 2% for the first 10 feet.
Step 5: Trace the drainage arrows.
Follow the arrows and look for low points, swales, and inlets. Each should connect logically, moving water off-site or to a detention area.
Step 6: Examine driveways and access points.
Driveway grades above 10% are typically too steep for comfort or code. Check transitions and ensure water won’t pond at the curb.
Step 7: Look for erosion control and slope stabilization notes.
These indicate silt fences, check dams, or temporary seeding areas. They’re critical for keeping soil in place during construction.
Before grading begins, these details should be cross-checked to ensure field conditions match the plan, drainage flows as designed, and compaction targets are met during roadway prep and base work.
Common Symbols and What They Mean
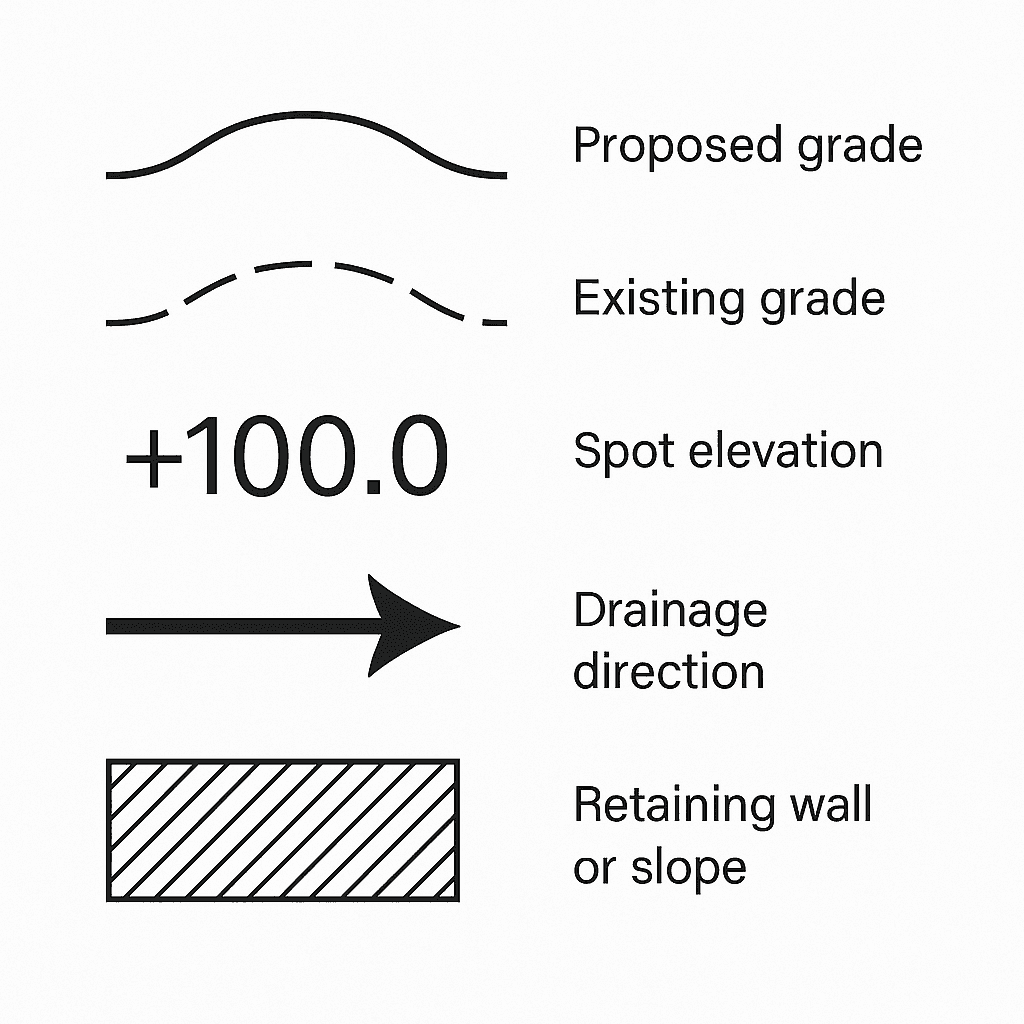
Symbol | Meaning | What to Look For |
Solid contour line | Proposed grade | Should form smooth, even drainage paths |
Dashed contour line | Existing grade | Compare for cut/fill balance |
“+100.0” | Spot elevation | Exact point of elevation |
Arrow | Drainage direction | Verify that flow moves away from structures |
Hatched area | Retaining wall or slope | Check for proper tie-in to grade |
Pro tip: When a contour line and a spot elevation appear to conflict, trust the spot elevation — it’s the more precise of the two.
Grading Plan vs. Drainage Plan — What’s the Difference?
It’s easy to mix these up because both deal with slopes and water movement. Here’s the key distinction:
A grading plan shows the shape of the ground — contours, elevations, slopes, and swales.
A drainage plan shows the flow of water through structures — inlets, storm pipes, culverts, and outlet points.
Put simply, the grading plan defines the ground’s shape, and the drainage plan manages where the water goes. When they’re coordinated, water moves off-site just as the engineer intended.
Kansas City Grading Plan Requirements (In Plain Terms)
In most Kansas City metro municipalities, a grading plan is required before land disturbance begins. While every jurisdiction varies slightly, here’s what you can expect:
Engineering stamp: Required for most new construction or major regrading.
Drainage direction: Must be shown clearly so runoff doesn’t impact neighboring lots.
Erosion and sediment control: Plans must identify silt fences, stabilized construction entrances, and sediment basins.
Compliance with stormwater design standards: The City of Kansas City, MO follows Chapter 5600 for stormwater management.
Site stabilization: Final grading must prevent ponding and promote positive drainage.
Across the Kansas City metro—from Lee’s Summit to Grain Valley—each city has its own grading standards. Coordinating plan reviews early helps ensure your site work stays compliant.
When to Bring in a Grading Contractor
If any of the following show up while reviewing your plans, it’s worth consulting a qualified grading contractor before work begins:
Slopes draining toward a building pad or driveway
Missing outlet paths for runoff
Driveway slopes exceeding 10%
No swale or ditch shown near low areas
Retaining walls without clear tie-ins
Erosion control details missing or incomplete
Catching these issues early can prevent costly rework later. A contractor with GPS-guided equipment and plan-matched elevations can verify that the grades built in the field match what’s specified on paper—often down to fractions of an inch.
Grading Plan Checklist (Save or Print)
Here’s a quick checklist to review before grading begins:
North arrow and scale shown
Benchmark or datum identified
Existing vs. proposed contours labeled clearly
Finished Floor Elevation (FFE) shown
Drainage arrows connect logically
Swales and ditches discharge properly
Driveway and pad slopes ≤10%
Cut/fill balance noted
Retaining walls and slopes detailed
Erosion control and stormwater devices shown
Utility trenches coordinated with proposed grades
Tie-ins to adjacent properties match elevations
Detention pond or outlet structure noted (if applicable)
Proof-roll and compaction requirements included
Sheet references match the civil set Reviewing this checklist early helps confirm that design intent and field conditions line up—reducing the chance of rework once grading and excavation begin.

Common Questions About Reading Grading Plans
What’s the difference between FFE and pad elevation?
FFE is the top of your finished slab or floor, while pad elevation is the compacted grade just below it — usually 6–8 inches lower.
What contour interval is typical?
Most residential or light commercial projects use 1- or 2-foot contour intervals. Larger sites may use 5-foot intervals for readability.
Who creates and seals a grading plan?
Usually a licensed civil engineer or land surveyor. During construction, grading contractors coordinate closely with the design team to ensure field grades match the approved plan.
Do I need a grading plan for minor grading or landscaping?
If you’re only reshaping topsoil or minor landscaping, usually not. But if it changes drainage flow, local permits may require it.
What happens if my site doesn’t match the approved plan?
City inspectors can require regrading or re-inspection — which means delays. Double-checking plan elevations before compaction and proof-roll helps prevent those issues.
The Payoff of a Well-Read Grading Plan
Understanding your grading plan isn’t just about paperwork — it’s about performance. Proper grading prevents drainage issues, extends pavement life, and keeps your site compliant from start to finish.
At Icon Grading & Construction, we use GPS-accurate machine control and field verification to ensure every elevation hits spec — from pad grading to roadway base compaction.
Ready to start your next project? Get a free quote anywhere in the Kansas City metro — including Blue Springs, Lee’s Summit, Independence, and Grain Valley.
More Articles


Load More